
How to Grow Winter Squash on a Fence: Space-Saving Technique for Bountiful Harvests
Intro for growing winter squash on a fence
Winter squash, with its sprawling vines and heavy fruits, might seem like a challenging crop for gardeners with limited space. However, growing winter squash vertically on a fence offers an ingenious solution that maximizes garden space while producing abundant harvests. This vertical growing method keeps fruits off the ground, reducing pest damage and diseases while improving air circulation. Winter squash varieties like butternut, acorn, and delicata thrive when trained upward, producing sweet, nutritious fruits that store well through winter months. With proper support and training, even the heaviest varieties can be successfully grown vertically in most temperate climates, making this technique ideal for small gardens, urban plots, or anyone looking to optimize growing space.
When to plant winter squash on a fence
Winter squash requires warm soil and frost-free conditions to thrive. Plant only when soil temperatures have reached at least 15-18°C (60-65°F) and all danger of frost has passed. In most temperate regions, this means waiting until late spring. Winter squash has a long growing season of 80-120 days, so timing is crucial to ensure fruits mature before the first autumn frosts. For gardeners in cooler regions (UK or US Zones 3-5), starting seeds indoors 3-4 weeks before the last frost date can extend the growing season. Those in warmer Mediterranean climates may plant earlier and enjoy a longer harvest window. Regardless of your region, ensure at least 3-4 months of warm weather before expected first frosts.
Best time to plant winter squash on a fence

For cool temperate regions (UK, Northern Europe, US Zones 3-5), plant winter squash outdoors from late May to early June, or start seeds indoors in April for transplanting. In moderate climates (US Zones 6-7), direct sow from mid-May to early June when soil has thoroughly warmed. Warm climate gardeners (US Zones 8-10, Mediterranean regions) can plant from April through June, with some regions allowing for a second late-summer planting for fall harvest. When transplanting seedlings, wait until they have developed 2-3 true leaves and harden them off for 7-10 days before moving them to their vertical growing space. Direct sowing works well in warmer regions with longer growing seasons, while transplants give northern gardeners the head start needed for full maturity.
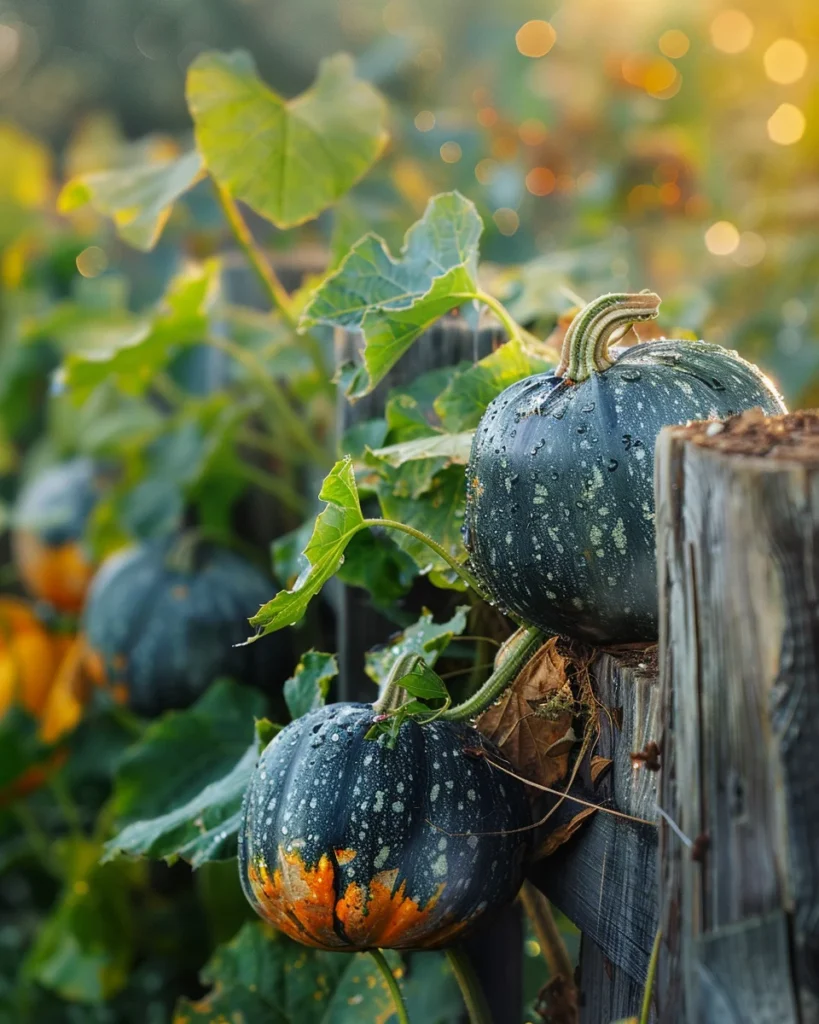
Best winter squash varieties to grow on a fence
- Butternut – Compact ‘Butterbush’ or ‘Honey Nut’ varieties produce 1-2 pound fruits that won’t strain supports while offering sweet, nutty flesh.
- Delicata – This smaller “sweet potato squash” has manageable 1-2 pound fruits with edible skin and excellent flavor that’s perfect for vertical growing.
- Acorn – ‘Table Queen’ produces compact fruits under 2 pounds that hang well on fences and mature earlier than larger varieties.
- Spaghetti Squash – ‘Small Wonder’ or ‘Orangetti’ varieties offer smaller, more manageable fruits for fence growing with the same pasta-like flesh.
- Kabocha – ‘Sweet Mama’ produces smaller 2-3 pound fruits with exceptionally sweet flesh that can be supported with slings on sturdy fences.
- Hubbard – ‘Blue Ballet’ is a smaller version of the traditional Hubbard with rich flavor and good storage qualities.
- Honeynut – This newer miniature butternut variety produces small, intensely sweet fruits perfect for vertical growing.
How to plant winter squash on a fence
Materials needed:
- Sturdy fence, trellis, or support structure (at least 6 feet/1.8m tall)
- Winter squash seeds or seedlings
- Compost or well-rotted manure
- Garden soil
- Mulch (straw or shredded leaves)
- Twine or soft plant ties
- Mesh bags, old t-shirts, or nylon stockings (for fruit slings)
- Watering can or hose with gentle spray attachment
Step-by-step planting:
- Select a fence location that receives at least 6-8 hours of direct sunlight daily, ideally with a north-south orientation to maximize light exposure.
- Prepare a trench about 30cm (12 inches) wide and 30cm (12 inches) deep along the fence line, mixing in plenty of compost or aged manure.
- Create planting mounds spaced 60-90cm (24-36 inches) apart along the fence line to improve drainage and soil warming.
- Plant 2-3 seeds per mound, 2.5cm (1 inch) deep, or transplant one seedling per mound.
- Water thoroughly after planting, ensuring the soil is evenly moist but not waterlogged.
- Apply a 5-7cm (2-3 inch) layer of mulch around plants (but not touching stems) to retain moisture and suppress weeds.
- Install any additional support structures or training wires on your fence if needed.
- If direct sowing, thin to the strongest plant per mound once seedlings have two true leaves.
- Begin training young vines toward the fence as soon as they’re long enough to reach it, gently securing with soft ties.
How to grow winter squash on a fence
Winter squash thrives in full sunlight, requiring at least 6-8 hours of direct sun daily for optimal growth and fruit production. Water deeply once or twice weekly, providing 2.5-5cm (1-2 inches) of water per week, focusing on the root zone while keeping foliage dry. Increase watering during fruit development and hot, dry periods. Apply a balanced organic fertilizer (5-10-10) when planting, then side-dress with compost or a nitrogen-reduced fertilizer when vines begin to run and again when fruits start forming.
Train vines by gently weaving them through fence openings or securing with soft plant ties, guiding main stems upward and allowing side branches to find their own support. As fruits develop, create slings from old t-shirts, mesh produce bags, or nylon stockings to support heavier fruits, tying the slings securely to the fence structure. For container growing, select a minimum 40-50L (10-12 gallon) container with excellent drainage, using a single plant per container and ensuring the fence or trellis is anchored securely to support the weight of developing fruits.
Prune if necessary by removing any excessive side shoots to focus plant energy on fruit production. Pinch off growing tips when plants reach the top of the support structure to encourage lateral growth and fruit development rather than excessive vine production.
Caring for winter squash on a fence
Monitor soil moisture consistently, especially during flowering and fruit development. Hand pollinate flowers in the morning if pollinator activity is low by transferring pollen from male flowers (with straight stems) to female flowers (with tiny fruits at their base) using a small brush. Common pests include squash bugs, cucumber beetles, and vine borers. Watch for wilting vines, holes in leaves, or clusters of bronze eggs on leaf undersides. Control with row covers until flowering, regular inspection and removal of eggs, and organic insecticidal soaps for infestations.
Powdery mildew often affects squash, appearing as white powdery patches on leaves. Prevent by maintaining good air circulation, avoiding overhead watering, and applying preventative sprays of diluted milk solution (1:10 ratio with water) or neem oil. Harvest winter squash when the rind is hard and cannot be pierced with a fingernail, the stem begins to dry and cork, and fruits have reached their mature color. Leave 5-7cm (2-3 inches) of stem attached when cutting fruits from vines using pruners. Cure harvested squash in a warm, dry location for 7-14 days before storing in a cool (10-15°C/50-60°F), dry place for 3-6 months depending on variety.
Understanding bolting in winter squash
Unlike leafy greens, winter squash doesn’t technically bolt, but it can experience premature flowering that reduces yield. This early flowering is typically triggered by stress factors including extreme temperature fluctuations, drought conditions, or nutrient deficiencies. Plants may produce an abundance of male flowers with few female flowers (those with tiny fruits at their base), resulting in poor fruit set.
To prevent stress-induced flowering issues, maintain consistent soil moisture, especially during hot periods. Apply mulch to regulate soil temperature and retain moisture. Ensure adequate nutrition with balanced fertilizers, avoiding excessive nitrogen which promotes vine growth at the expense of fruit production. If plants begin flowering very early with minimal vine development, remove the earliest flowers to encourage more vegetative growth before fruit set. In extreme heat, provide afternoon shade to reduce plant stress. Unlike true bolting crops, winter squash will continue to produce throughout the season even after early flowering begins.
Why does winter squash turn bitter?
- Cucurbitacin development – Natural compounds that increase with plant stress; maintain consistent watering and optimal growing conditions to prevent.
- Cross-pollination with ornamental gourds or wild cucurbits – Plant squash away from decorative gourds or wild cucumber relatives; save seeds only from isolated plants.
- Environmental stress – Extreme heat, drought, or nutrient fluctuations can trigger bitterness; maintain consistent care throughout the growing season.
- Immature harvest – Squash harvested too early may taste bitter; ensure fruits have reached full maturity with hardened rinds and proper color development.
- Genetic factors – Some varieties naturally contain more bitter compounds; choose varieties known for sweetness and good flavor.
Companion planting for winter squash on a fence
Good companions:
- Nasturtiums – Attract pollinators while repelling squash bugs and cucumber beetles.
- Marigolds – Deter nematodes and other soil pests that might damage squash roots.
- Radishes – Quick-growing crop that can be harvested before squash needs the space, while deterring cucumber beetles.
- Borage – Attracts beneficial pollinators and predatory insects while improving squash flavor and growth.
- Beans or peas – Can share the same vertical support while fixing nitrogen in the soil that benefits squash.
- Mint – Planted nearby (but contained to prevent spreading) helps repel squash bugs and aphids.
Avoid planting near:
- Potatoes – Compete for nutrients and can increase susceptibility to fungal diseases.
- Other cucurbits – Cucumbers, melons, and other squash varieties compete for the same pollinators and can share pests and diseases.
- Brassicas – Cabbage family plants have different nutrient needs and can stunt squash growth when planted too closely.
Seasonal calendar
- February-March: Start seeds indoors in warmer regions; prepare support structures.
- April: Start seeds indoors in cooler regions; direct sow in very warm climates.
- May: Transplant seedlings when soil has warmed and frost danger has passed; direct sow in moderate climates.
- June: Continue direct sowing in cooler regions; train young vines to climb fence; thin if needed.
- July: Apply side dressing of compost; monitor for pests; continue training vines; install fruit slings as needed.
- August: Maintain watering during fruit development; watch for powdery mildew; pinch vine tips if reaching top of support.
- September: Begin harvesting early maturing varieties; protect from early frosts if needed.
- October: Harvest remaining fruits before hard frost; cure for storage.
- November: Clean up vines after harvest; compost disease-free plant material; store cured squash.
Note: In zones 9-10, planting may begin 1-2 months earlier; in zones 3-4, delay all dates by 2-3 weeks.
Problems & solutions
| Problem | Quick Fix |
|---|---|
| Fruits falling from fence | Install fabric slings under developing fruits, securing to fence with strong twine |
| Powdery white spots on leaves | Improve air circulation, apply milk spray (1:10 dilution) or neem oil weekly |
| Flowers dropping without forming fruit | Hand pollinate in morning using small brush to transfer pollen from male to female flowers |
| Squash bugs or cucumber beetles | Place boards near plants overnight, flip in morning to collect and destroy bugs; apply diatomaceous earth around plant bases |
| Vine borer damage (sudden wilting) | Slit stem lengthwise near entry hole, remove borer, cover damaged section with soil to encourage new root growth |
| Yellowing leaves | Check for overwatering; ensure adequate nutrients with side dressing of compost or balanced organic fertilizer |
| Fence leaning from weight | Install additional support posts; reduce fruit load by thinning; use stronger slings attached to sturdier parts of structure |
Common questions about growing winter squash on a fence
How often should I water winter squash growing on a fence?
Water deeply 1-2 times weekly, providing 2.5-5cm (1-2 inches) of water per week. Vertical growing may require slightly more frequent watering than ground-grown plants. Increase during fruit development and hot weather, but avoid wetting foliage to prevent disease.
How much sunlight do vertically grown winter squash need?
Winter squash requires full sun with at least 6-8 hours of direct sunlight daily. When growing on a fence, ensure the structure doesn’t cast excessive shade on the plants and orient north-south if possible to maximize sun exposure throughout the day.
What’s the best fence type for growing winter squash?
Use sturdy fencing at least 180cm (6 feet) tall with openings large enough to weave vines through or attach ties. Cattle panels, heavy-duty garden fencing, chain link, or wooden trellises with strong wire mesh work well. Ensure the structure can support 4.5-9kg (10-20 pounds) of fruit per plant.
How far apart should I space winter squash plants along a fence?
Space plants 60-90cm (24-36 inches) apart along the fence line. While vertical growing allows closer spacing than traditional methods, adequate spacing ensures good air circulation and reduces disease pressure.
Can all winter squash varieties grow on a fence?
While all varieties can be trained upward, smaller-fruited varieties (under 2.5kg/5lbs) are most suitable. Larger varieties like standard Hubbard or Banana squash can be grown vertically but require robust support structures and reliable fruit slings to prevent breakage.
How do I know when winter squash is ready to harvest?
Winter squash is ready when the rind is hard and cannot be pierced with a fingernail, the stem begins to dry and cork, and the fruit has reached its mature color. The skin should have a dull, not glossy appearance. Most varieties require 80-120 days from planting to harvest.
Do I need to hand pollinate winter squash growing on a fence?
Hand pollination is not always necessary but can increase yields, especially in gardens with few pollinators or during weather that limits bee activity. Transfer pollen from male flowers (with straight stems) to female flowers (with tiny fruits at their base) using a small brush in the morning when flowers are fully open.