
A practical, low-cost guide to dusting faster—using tools you already have and a few simple shortcuts.
Dust shows up in every home, in every season. It settles on shelves, clings to blinds, collects on fan blades, and hides in vents and tight gaps you rarely think about—until you see it. Even in homes that feel “clean,” fine particles still drift in through doors and windows, shed from fabrics, and settle on flat surfaces. The result is that dust can reappear quickly, especially in high-traffic rooms like living areas, bedrooms, and home offices.
The good news: dusting doesn’t have to be a long, expensive chore. If you’re short on time, working with a tight budget, or simply tired of “traditional” dusting tools that don’t work well, the 15 hacks below can help you clean more efficiently and with less mess. Many of these ideas focus on trapping dust on the first pass so you spend less time re-wiping and less time cleaning up the dust that falls to the floor afterward.
Why Dusting Matters (Beyond “Looking Clean”)
Regular dusting keeps your home looking cared for, but it also helps you stay ahead of buildup in places that are easy to ignore—like fan blades, vents, baseboards, and plant leaves. A few smart methods can reduce how often you need to re-clean the same surfaces, and several of these ideas also help limit dust from becoming airborne while you work.
When dust is left to accumulate, it tends to cling more stubbornly to surfaces and can mix with humidity or kitchen residue, making it harder to remove later. It can also build up in textured areas (like lampshades, vent grilles, and wicker baskets) where quick swipes don’t reach. By dusting more strategically—even if you do it less often overall—you can keep most rooms in a “maintenance mode” where cleanup is fast instead of overwhelming.
Before You Start: A Quick, Orderly Approach
You’ll get better results—and avoid re-dusting—if you work in a consistent sequence. A routine matters because dust doesn’t stay put: it falls, it drifts, and it moves when you bump surfaces or use “blow out” tools. A few minutes of planning can prevent the common frustration of cleaning a coffee table, then watching new dust land on it while you do the shelves.
Before you begin, it helps to do two small prep steps that make every hack in this list work better: first, remove obvious clutter from surfaces (a quick basket sweep works), and second, choose a “dust catcher” strategy (microfiber cloths, a lightly damp cloth, or a vacuum nearby). The goal is to clean once and move on.
Start From the Top
Always begin at the highest points in the room and work downward. Dust falls. If you start with floors or low surfaces, you’ll end up dirtying them again as you clean shelves, molding, and ceiling areas above.
A simple flow that works in most rooms: ceiling corners and crown molding → fan blades and upper shelves → furniture surfaces → baseboards → floors.
If you want to make this even more efficient, carry a small “dust kit” with you so you don’t keep walking back and forth. A simple kit can be a tote or bucket with two microfiber cloths, a couple of elastic bands, a lint roller, and a small spray bottle. You’ll spend less time searching for supplies and more time actually finishing the room.
The 15 Dusting Hacks (Simple Steps, Big Payoff)
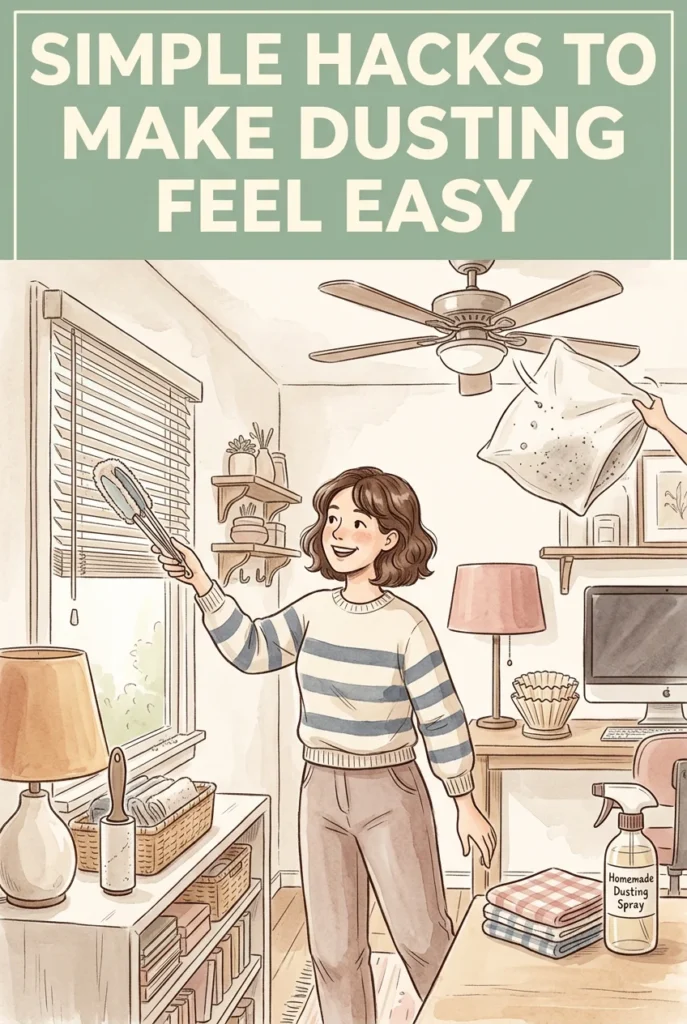
1) Dusting Cloth on Tongs (Perfect for Blinds)
This method makes blinds dramatically easier to clean—especially when you want to dust both sides at once. It’s also a good option for mini blinds where dust tends to settle on the top edge and cling to the underside.
What you need: a pair of tongs, two dusting cloths, and elastic bands.
How to do it: Wrap one cloth around each side of the tongs and secure each with an elastic band. Slide the padded tongs along each slat/blade to trap dust. When the cloth fills up, flip it to a clean side or swap it out. Wash, dry, and reuse the cloths when finished.
Extra tip: Work from the top of the blinds to the bottom so you’re not knocking dust onto already-clean slats. For very dusty blinds, you can do a first pass dry (to pick up the bulk) and a second pass with a lightly moistened cloth to finish, as long as the material is safe for light moisture.
2) Pillowcase Method for Ceiling Fan Blades (No Dust Shower)
If you’ve ever dusted a ceiling fan and watched debris fall onto the floor—or worse, onto your furniture—this hack is for you. It’s a simple way to keep dust contained so cleanup doesn’t turn into an additional chore.
What you need: an old pillowcase.
How to do it: Open the pillowcase and slide it over one fan blade. With one hand on each side of the blade (outside the pillowcase), wipe in a single swipe to pull dust into the case. Repeat for each blade. When done, empty the dust into the bin and wash the pillowcase for reuse.
Extra tip: If your fan sits above a bed or sofa, this method is especially helpful because it prevents debris from sprinkling onto fabrics. It also makes it easier to see what you’ve removed, so you’re less likely to miss the top side of the blade where most dust collects.
3) Coffee Filters for Screens (And Mirrors)
Computer and television screens often collect dust, fingerprints, and smudges. Instead of buying specialty wipes, you can use a simple kitchen item. Coffee filters are designed to be lint-minimizing, so they’re less likely to leave fibers behind the way paper towels can.
What you need: coffee filters.
How to do it: Gently wipe the screen with a coffee filter to lift dust and fingerprints without leaving lint behind. This also works well on mirrors.
Extra tip: Use a light touch and avoid pressing hard, especially on delicate screens. If you’re working around buttons, edges, or corners where dust builds up, fold the filter into a smaller pad so you can guide it more precisely.
4) Homemade Dusting Spray (Easy Recipe)
Dusting spray can make the job quicker and more effective than dry dusting alone. You can also make your own with basic ingredients. A light spray helps dust cling to the cloth instead of floating into the air, which makes the wipe-down feel more controlled.
What you need: 1 cup of water, 1 tablespoon of olive oil, 1 cup of 70% isopropyl alcohol, and 10 drops of essential oil.
How to do it: Combine the ingredients in a spray bottle and shake well. Spray lightly and wipe down furniture to capture dust instead of spreading it around.
Extra tip: Shake the bottle before each use so the ingredients stay well mixed. Spray onto the cloth rather than directly onto the surface when you’re working near electronics, picture frames, or seams where liquid could seep in. A light mist is enough; heavy spraying can create streaks and doesn’t improve dust pickup.
5) DIY Dusting Wipes (Moist, Convenient, and Reusable)
If you like the convenience of pre-moistened wipes, you can create a simple homemade version. This can be especially useful for quick touch-ups, like wiping a bookshelf, dresser, or nightstand without pulling out a full set of cleaning supplies.
What you need: cleaning cloths, water, one lemon, and an herb of your choice.
How to do it: Mix water and lemon juice, then pour it over the cloths in a jar. If you want, add lemon slices and your chosen herb for a fresh-looking display. Use a cloth when you’re ready to dust, then wash and reuse.
Extra tip: Keep the jar in a convenient place so the wipes are easy to reach when you notice dust building up. If you’re dusting multiple rooms, take only the number of cloths you need so the others stay clean and ready. When the cloth starts to drag or smear dust, swap it for a fresh one and keep moving.
6) Microfiber Cloth on a Broom for Baseboards and Crown Molding
Baseboards and crown molding can be frustrating because they often require kneeling or climbing. This hack helps you dust both low and high trim without extra strain. It also helps you dust long stretches quickly, which makes it more likely you’ll actually keep up with it.
What you need: a broom, a microfiber cloth, and elastic bands.
How to do it: Wrap the microfiber cloth around the broom head and secure it with elastic bands. Sweep it along baseboards or crown molding with steady strokes. It’s fast, and you can cover long runs of trim in one pass.
Extra tip: Use steady, overlapping strokes so you don’t leave dusty edges behind. If the cloth becomes loaded with dust, pause and shake it outside or swap to a clean cloth. For baseboards that have sticky residue or scuffs, you can follow your dusting pass with a second cloth that’s lightly dampened (when appropriate for the paint finish).
7) Canned Air for Vents, Keyboards, and Pianos
Canned air isn’t only for electronics repair. It’s useful for pushing dust out of places cloths can’t reach. It’s most effective when you already have a plan to catch the dust you’re dislodging, so it doesn’t just resettle elsewhere in the room.
Where it helps: vents, keyboards, and pianos.
How to do it: Keep the can angled away from your body and spray to dislodge dust. Avoid pointing the nozzle directly into the vent, as that can push debris deeper inside. Instead, maintain an angle so dust is blown outward where you can capture it.
Extra tip: If possible, hold a vacuum hose nearby (not touching delicate surfaces) so you can immediately collect what you loosen. Use short bursts rather than a long continuous spray, which gives you more control and helps prevent dust from drifting through the room.
8) Dryer Sheets for Furniture (Dust Pickup + Reduced Attraction)
Dryer sheets are a versatile household item and can be surprisingly effective at dusting. They glide easily, pick up fine particles, and are convenient for quick wipe-downs when you don’t want to fetch a full cleaning kit.
How to do it: Wipe furniture surfaces with a dryer sheet to pick up dust efficiently. In addition to leaving a fresh scent, the surface may be less likely to attract dust right away. Keep a box nearby so it’s easy to grab one on dusting day.
Extra tip: Use dryer sheets for solid, wipeable surfaces like dressers, side tables, and shelves. For delicate finishes or antique wood pieces, stick to a microfiber cloth and a gentle approach to avoid leaving residue. If a dryer sheet starts to bunch or snag on corners, fold it into a smaller pad so you can work more precisely.
9) Microfiber Cloth + Alcohol (When You Need a Quick Option)
If you don’t have dusting spray ready—or you want a simple one-step wipe—alcohol can help lift dust and sanitize at the same time. Because it evaporates quickly, it’s often useful for areas you want to dry fast, such as certain non-wood surfaces.
How to do it: Lightly moisten a microfiber cloth with alcohol and wipe surfaces. Work relatively quickly because alcohol evaporates fast (and higher concentrations dry even faster).
Important note: Avoid using alcohol on wood surfaces, as it may cause damage.
Extra tip: Less is more. A lightly moistened cloth is enough to pick up dust without leaving streaks. If you’re cleaning around electronics, avoid saturating the cloth, and don’t allow moisture to drip into seams, buttons, or charging ports.
10) Lint Roller for Lampshades
Lampshades can trap dust, and the material can make them slow to clean with a standard cloth. A lint roller is especially handy for fabric shades, textured surfaces, and shades with pleats where dust settles into ridges.
What you need: a lint roller.
How to do it: Roll over the lampshade surface until the sheet collects dust. Replace sheets as needed, depending on the size of the shade and how dusty it is.
Extra tip: Rotate the shade as you roll so you cover it evenly and don’t miss the side facing the wall. For heavily textured shades, roll in more than one direction (vertical and horizontal) to pull dust from the grooves. Finish by checking the top rim of the shade, which often holds a ring of dust that’s easy to overlook.
11) Make Your Own Swiffer-Style Towels with Flannel
Swiffer-style tools are convenient, but replacement wipes can add up. A reusable alternative can be made at home. Flannel works well because it tends to grab dust, and it can be washed repeatedly.
What you need: flannel material.
How to do it: Cut flannel into squares sized to fit your Swiffer-style base. Attach as you would a standard replacement wipe. It will pick up dust and help buff the floor, while saving money over time.
Extra tip: Make several pads at once so you can swap to a fresh one when the first becomes dusty. After use, shake them out outdoors or into a trash bin, then wash and dry. Keeping a small stack of clean flannel pads nearby turns floor dusting into a quick habit rather than a project.
12) Use a Hair Dryer on Cold to Dust Indoor Plants
Indoor plants collect dust on their leaves, and it’s easy to overlook them during routine cleaning. Dust can block leaves from absorbing enough light, which can contribute to deficiencies. This is one of those “small tasks” that can make a noticeable difference, especially if you have large-leaf plants that show dust quickly.
How to do it: Use a handheld hair dryer on the cold setting to blow dust off the leaves. You can do this as an early step, then follow up with your preferred wiping method to finish the room.
Extra tip: Aim the airflow across the leaf surface rather than straight down into the soil to avoid blowing loose dirt. Use a gentle setting if your dryer has one, and keep a little distance so you don’t stress delicate leaves. If dust is heavy, you can blow first and then wipe individual leaves with a soft cloth for a more polished finish.
13) Cloth + Ruler for Tight Spaces
Some dusty spots are awkward—narrow gaps, small openings, and areas where your hand simply won’t fit. This hack is an easy way to reach deep crevices without buying a specialty tool, and it gives you more control than trying to shove a cloth into a gap with your fingertips.
What you need: a ruler, a dusting cloth, and an elastic band.
How to do it: Wrap the cloth around the ruler and secure each end with an elastic band. Slide it into tight areas to remove dust. This is especially useful inside an air conditioner unit or radiator vent. If needed, lightly moisten the cloth with dusting spray or alcohol (when appropriate for the surface).
Extra tip: If you’re working in a particularly narrow opening, wrap the cloth more tightly so it doesn’t snag. For gaps behind appliances or between furniture and a wall, this method can help you capture dust without having to move heavy pieces as often.
14) Refrigerator Coil Brush + Vacuum (For the Back of the Fridge)
Dust buildup behind the refrigerator can feel intimidating, but a brush-and-vacuum combination makes it manageable. This area often gets ignored because it’s out of sight, but it can collect a surprising amount of lint and dust, especially if you have pets or a busy kitchen.
What you need: a refrigerator coil brush and a vacuum.
How to do it: Use the coil brush to loosen dust from the coils, then vacuum immediately to capture what you dislodged. This helps remove dust trapped in and around the coil area more efficiently than wiping alone.
Extra tip: Work slowly and methodically so you don’t just shift debris around. Vacuum after each section you brush, rather than brushing everything first and then trying to chase the dust cloud. If moving the fridge is difficult, pull it out just enough to access the back safely and avoid straining by doing it in small increments.
15) One-Step, Low-Mess Dusting Mindset: Trap Dust, Don’t Chase It
Several hacks in this list share the same advantage: they capture dust rather than pushing it into the air. The pillowcase fan method traps debris inside the case. Moist wipes hold dust instead of scattering it. Coffee filters reduce lint. When choosing your approach, prioritize tools and methods that collect dust in one pass whenever possible—especially if you’re short on time.
As a general rule, the fastest dusting sessions feel almost “quiet”: fewer vigorous swipes, less flicking dust off cloths in the middle of the room, and less chasing particles that land somewhere else. When you treat dust as something to contain (instead of something to move around), you also reduce the chances of it settling right back onto the surfaces you just cleaned.
Tips to Make Dusting Faster (And Keep It Under Control)
- Work top-to-bottom every time: It prevents re-cleaning and keeps your routine organized.
- Pair “blow out” with “vacuum up”: If you use canned air, plan to capture loosened dust afterward.
- Use the right tool for the surface: Lint rollers for fabric shades, tongs for blinds, a ruler for narrow gaps.
- Refresh your cloths as you go: Flip to a clean side or swap cloths before you start smearing dust around.
- Choose reusable options when possible: Washable cloths and DIY flannel pads can reduce ongoing costs.
It also helps to